data.sparkfun.com は、電子デバイスを販売しているSparkFunが提供するクラウドストレージです。今回はそこにArduinoで集めたセンサーの情報を上げて、グラフ表示するデモを作ります。
全体の流れはこんな感じです。

使う道具
・Arduino Uno R3・CC3000 WiFi シールド
・Arduinoシールド用ピンソケットのセット(R3対応)
・ミニブレッドボード
・ジャンパワイヤ
・温度センサー(LM35DZ)
・光センサー(CdSセル)
・抵抗10kΩ
Arduinoの準備
wifiシールドにピンソケットをハンダ付けし、ライブラリをインストールします。WebClientのデモを開き、SSID・パスワードなどを設定し、Webサーバーにアクセスしレスポンスを受け取れることを確認します。
詳しくはこちらのエントリーをご覧ください。
IFTTTとArduinoで作る侵入アラーム [2]Arduino の準備

温度センサーと光センサーをジャンパワイヤーで繋ぎます。


配線図。SparkFunのWifi-Shieldのデータが無かったので、汎用シールド基板のイラストで代用していますが、繋ぐ場所は同じです。

data.sparkfun.com
data.sparkfun.comは、http getで送った値を保存し、APIを通じてJSONなどの形で取り出す事ができます。まず自分のデータを保存するストリームを作ります。data.sparkfun.comにアクセスし、[Create]をクリックします。

ストレージの情報を設定します。
・Title タイトル
・Description 詳細
・Show in Public Stream List 全体から見えるリストに加えるか
・Fields 値を受け取るフィールドの名前
・Stream Alias
ストリームのURL("streamtest"と入力すれば、 "http://data.sparkfun.com/streamtest"でアクセスできる)
・Tags タグ
・Location 場所

次の画面で、ストリームに関するキーなどが発行されます。
忘れないようにメールに送るか、JSONデータをダウンロードできる。
・Public URL ストリームのURL
・Public Key ストリームからデータを取り出すときに必要
・Private Key ストリームにデータを送るときに必要
・Delete Key ストリームを削除するときに必要

これでストリームの準備は完了。
Arduinoからリクエストを送る
メーカーが配布しているサンプルスケッチを元に変更を加えていきます。>Phant_CC3000.zip
Progmemをコメントアウト
//#include
SSID・パスワード・セキュリティの種類の入力します。先ほど行ったArduinoの準備と同じ手順です。
char ap_ssid[] = "#######";                // SSID of network
char ap_password[] = "#######";        // Password of network
unsigned int ap_security = WLAN_SEC_UNSEC; // Security of network
先ほど発行されたPublicKeyとPrivateKeyを入力。
const String publicKey = "##################";
const String privateKey = "##################";
値を受け取るフィールドの数と名前。今回は、"temp"と"light"の2つ
const byte NUM_FIELDS = 2;
const String fieldNames[NUM_FIELDS] = {"temp", "light"};
String fieldData[NUM_FIELDS];
ピンの設定。温度センサーがA0、光センサーがA1ピン。
const int tempPin = A0;
const int lightPin = A1;
analogRead()でセンサーの値を読み込む。温度センサーは温度℃に変換してから格納。
postData()で送信処理を行い、30秒待機。
int sensorValue = analogRead(A0);
float voltage = sensorValue * (5.0 / 1023.0);
float temp = voltage * 10;

fieldData[0] = String( temp );
fieldData[1] = String(analogRead(lightPin));
postData();
delay(30000);

/*
if (!digitalRead(triggerPin))
  {
    // Gather data:
    fieldData[0] = String(analogRead(lightPin));
    fieldData[1] = String(digitalRead(switchPin));
    fieldData[2] = name;

    // Post data:
    Serial.println("Posting!");
    postData(); // the postData() function does all the work,
                // check it out below.
    delay(1000);
  }
*/
postData()では、上で記入したkeyやフィールドの情報を繋いでgetリクエストを作っています。
GET /input/publicKey?private_key=privateKey&light=1024&switch=0&time=5201 HTTP/1.1\n
Host: data.sparkfun.com\n
Connection: close\n
Arduinoに電源を入れてしばらく待つと、データが上がってきます。
https://data.sparkfun.com/streams/g6q0b8D1WwI6M9nR2wAw

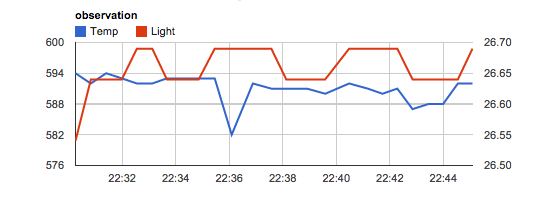
グラフの描画
data.Sparkfun APIは以下のようにして、JSON, CSVなどの形式でデータを取得することができます。https://data.sparkfun.com/output/g6q0b8D1WwI6M9nR2wAw.json
データの可視化のため、今回はGoogle Chartを使いました。
Google Chartの使い方はこちらのサイトを確認してください。
Google Chart Tools の使い方
Google Chart API入門
Arduinoスケッチ全文
// SPI and the pair of SFE_CC3000 include statements are required
// for using the CC300 shield as a client device.
#include <SPI.h>
#include <SFE_CC3000.h>
#include <SFE_CC3000_Client.h>
// Progmem allows us to store big strings in flash using F().
// We'll sacrifice some flash for extra DRAM space.
//#include <Progmem.h>

////////////////////////////////////
// CC3000 Shield Pins & Variables //
////////////////////////////////////
// Don't change these unless you're using a breakout board.
#define CC3000_INT      2   // Needs to be an interrupt pin (D2/D3)
#define CC3000_EN       7   // Can be any digital pin
#define CC3000_CS       10  // Preferred is pin 10 on Uno
#define IP_ADDR_LEN     4   // Length of IP address in bytes

////////////////////
// WiFi Constants //
////////////////////
char ap_ssid[] = "########";                // SSID of network
char ap_password[] = "########";        // Password of network
unsigned int ap_security = WLAN_SEC_WPA; // Security of network
// ap_security can be any of: WLAN_SEC_UNSEC, WLAN_SEC_WEP,
//  WLAN_SEC_WPA, or WLAN_SEC_WPA2
unsigned int timeout = 30000;             // Milliseconds
char server[] = "data.sparkfun.com";      // Remote host site

// Initialize the CC3000 objects (shield and client):
SFE_CC3000 wifi = SFE_CC3000(CC3000_INT, CC3000_EN, CC3000_CS);
SFE_CC3000_Client client = SFE_CC3000_Client(wifi);

/////////////////
// Phant Stuff //
/////////////////
const String publicKey = "########";
const String privateKey = "########";
const byte NUM_FIELDS = 2;
const String fieldNames[NUM_FIELDS] = {"temp", "light"};
String fieldData[NUM_FIELDS];

//////////////////////
// Input Pins, Misc //
//////////////////////
const int tempPin = A0;
const int lightPin = A1;
//const int triggerPin = 3;
//const int lightPin = A0;
//const int switchPin = 5;
String name = "Anonymouse";
boolean newName = true;

void setup()
{
  Serial.begin(115200);

  // Setup Input Pins:
  pinMode(tempPin, INPUT_PULLUP);
  pinMode(lightPin, INPUT_PULLUP);

  // Set Up WiFi:
  setupWiFi();

  Serial.println(F("=========== Ready to Stream ==========="));
  Serial.println(F("Press the button (D3) to send an update"));
  Serial.println(F("Type your name (no spaces!), followed by '!' to update name"));


}

void loop()
{
  int sensorValue = analogRead(A0);
  float voltage = sensorValue * (5.0 / 1023.0);
  float temp = voltage * 10;

  fieldData[0] = String( temp );
  fieldData[1] = String(analogRead(lightPin));
  postData();
  delay(30000);

  // If the trigger pin (3) goes low, send the data.
  /*
  if (!digitalRead(triggerPin))
  {
    // Gather data:
    fieldData[0] = String(analogRead(lightPin));
    fieldData[1] = String(digitalRead(switchPin));
    fieldData[2] = name;

    // Post data:
    Serial.println("Posting!");
    postData(); // the postData() function does all the work,
                // check it out below.
    delay(1000);
  }
  */


  // Check for a new name input:
  if (Serial.available())
  {
    char c = Serial.read();
    if (c == '!')
    {
      newName = true;
      Serial.print("Your name is ");
      Serial.println(name);
    }
    else if (newName)
    {
      newName = false;
      name = "";
      name += c;
    }
    else
    {
      name += c;
    }
  }
}

void postData()
{

  // Make a TCP connection to remote host
  if ( !client.connect(server, 80) )
  {
    // Error: 4 - Could not make a TCP connection
    Serial.println(F("Error: 4"));
  }

  // Post the data! Request should look a little something like:
  // GET /input/publicKey?private_key=privateKey&light=1024&switch=0&time=5201 HTTP/1.1\n
  // Host: data.sparkfun.com\n
  // Connection: close\n
  // \n
  client.print("GET /input/");
  client.print(publicKey);
  client.print("?private_key=");
  client.print(privateKey);
  for (int i = 0; i < NUM_FIELDS; i++)
  {
    client.print("&");
    client.print(fieldNames[i]);
    client.print("=");
    client.print(fieldData[i]);
  }
  client.println(" HTTP/1.1");
  client.print("Host: ");
  client.println(server);
  client.println("Connection: close");
  client.println();

  while (client.connected())
  {
    if ( client.available() )
    {
      char c = client.read();
      Serial.print(c);
    }
  }
  Serial.println();
}

void setupWiFi()
{
  ConnectionInfo connection_info;
  int i;

  // Initialize CC3000 (configure SPI communications)
  if ( wifi.init() )
  {
    Serial.println(F("CC3000 Ready!"));
  }
  else
  {
    // Error: 0 - Something went wrong during CC3000 init!
    Serial.println(F("Error: 0"));
  }

  // Connect using DHCP
  Serial.print(F("Connecting to: "));
  Serial.println(ap_ssid);
  if (!wifi.connect(ap_ssid, ap_security, ap_password, timeout))
  {
    // Error: 1 - Could not connect to AP
    Serial.println(F("Error: 1"));
  }

  // Gather connection details and print IP address
  if ( !wifi.getConnectionInfo(connection_info) )
  {
    // Error: 2 - Could not obtain connection details
    Serial.println(F("Error: 2"));
  }
  else
  {
    Serial.print(F("My IP: "));
    for (i = 0; i < IP_ADDR_LEN; i++)
    {
      Serial.print(connection_info.ip_address[i]);
      if ( i < IP_ADDR_LEN - 1 )
      {
        Serial.print(".");
      }
    }
    Serial.println();
  }
}
HTML全文
<!DOCTYPE html>
<html>
  <head>
    <!-- EXTERNAL LIBS-->
    <script src="https://ajax.googleapis.com/ajax/libs/jquery/1.11.1/jquery.min.js"></script>
    <script src="https://www.google.com/jsapi"></script>

    <!-- EXAMPLE SCRIPT -->
    <script>

      // onload callback
      function drawChart() {

        var public_key = '#######';

        // JSONP request
        var jsonData = $.ajax({
          url: 'https://data.sparkfun.com/output/' + public_key + '.json',
          data: {page: 1},
          dataType: 'jsonp',
        }).done(function (results) {

          var data = new google.visualization.DataTable();

          data.addColumn('datetime', 'Time');
          data.addColumn('number', 'Light');
          data.addColumn('number', 'Temprature');

          $.each(results, function (i, row) {
            data.addRow([
              (new Date(row.timestamp)),
              parseFloat(row.temp),
              parseFloat(row.light)
            ]);
          });

          var chart = new google.visualization.LineChart($('#chart').get(0));

          chart.draw(data, {
            title: 'observation',
            series:[
              {targetAxisIndex:0}, // 第1系列は左のY軸を使用
              {targetAxisIndex:1}, // 第2系列は右のY時を使用
            ]
          });

        });

      }

      // load chart lib
      google.load('visualization', '1', {
        packages: ['corechart']
      });

      // call drawChart once google charts is loaded
      google.setOnLoadCallback(drawChart);

    </script>

  </head>
  <body>
    <div id="chart" style="width: 100%;"></div>
  </body>
</html>